Guides
Dress lining attached to a zipper: what the stitches join
A dress lining can be intentionally attached to the zipper tape to finish the inner opening. Identify the tape, working teeth and slider separately, and look at which layers the stitches join. Keep the attachment intact while checking an unfamiliar construction; caught fabric in the slider is a different concern.
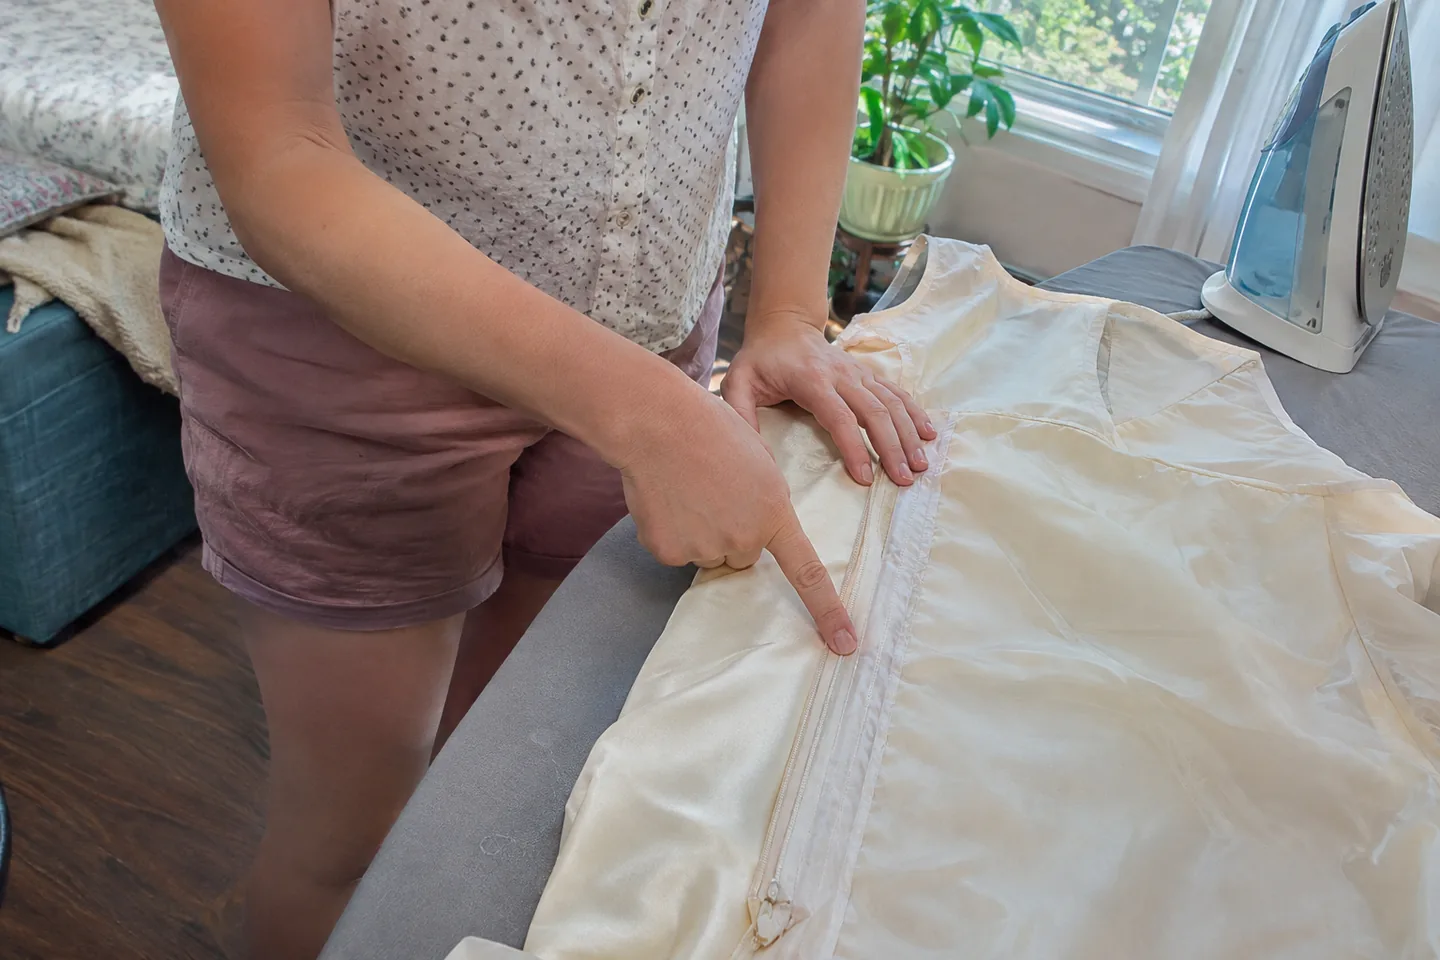
Follow the lining edge before judging the attachment
A dress lining can be intentionally sewn to the fabric tape beside a zipper. That connection finishes the inner opening; it is different from loose fabric being caught in the moving slider. Look at where the stitches run and which layers they join before assuming that the lining should hang free at this point.
Begin with the dress supported and the inside visible. Avoid pulling the two layers apart to see whether they separate. A finished attachment may resist because it is doing its intended job. If the construction is unfamiliar, keep it intact and ask the maker or a dressmaker to identify it on the actual garment.
| Visible feature | Question to keep separate |
|---|---|
| Lining edge stitched beside the zipper | How this opening is finished |
| Fabric drawn into the slider | A caught-fabric problem |
| Small link near a hem | A lining attachment elsewhere |
| Pulling when the dress is fastened | Fit, positioning and closure operation |
What published construction examples show
Megan Nielsen's sleeveless-dress tutorial shows the lining joined to zipper tape as part of its finishing sequence. The Karri dress lining tutorial also connects those parts during construction. These examples demonstrate intentional attachments. They do not establish that every dress uses the same sequence or should be changed to match.
Sense & Sensibility's lapped-zipper example describes securing the lining beside that particular opening. A lapped closure and an invisible zipper are different constructions. Keep the relevant instructions with the pattern or garment instead of borrowing one stitch placement as a universal repair rule.
Separate tape, teeth and slider
The zipper tape is the fabric strip supporting the closure. Its working teeth or coil and the moving slider are different parts. A lining edge attached to tape is not automatically trapped in the slider. Check which part you can actually see, and describe the position instead of calling every nearby stitch a blockage.
If material is caught in the moving closure, stop forcing it. Our caught-fabric guide addresses that different observation. This identification check does not tell you to unpick the lining, apply a product or keep pulling until the closure releases.
Check both sides without a strength test
Look at the two inner edges in the same supported position. Record an open seam, a loose end or a section that looks different, but avoid deciding from symmetry alone that a stitch is wrong. A construction detail may vary around a lap, seam junction or the bottom of an opening.
Do not repeatedly operate a closure that is catching or resisting. For a new purchase, retain the tags and follow the actual fitting and return conditions. For a dress you own, take a clear photograph showing the concern and a wider view that locates it. No remote diagram can reveal all the allowance or internal structure of the physical dress.
Keep other lining attachments in their own notes
A connection along the zipper opening is not the same as a thread chain near the skirt hem. Our lining-chain guide concerns those small links, while the visible-lining guide focuses on an inner edge below the outer skirt. Finding one feature does not explain every lining concern.
If the lining pulls only when the dress is worn, record that separately from how its zipper edge is finished. Describe the intended underlayer and when the concern appears. The fitting question and the attachment question may be related, but neither can be resolved by automatically removing the stitches.
Choose the question you need to ask
The edge is neatly sewn to the zipper tape
Keep the attachment intact. Ask whether it is the intended finish for this dress if you need clarification; published examples show that such a connection can be deliberate.
Material appears inside the moving slider
Stop forcing the closure. Describe the caught material and follow garment-specific advice; do not treat it as a reason to cut an unrelated lining attachment.
An inner seam is open or its purpose is unclear
Record its location and preserve the original state. Ask the retailer or dressmaker to inspect it before choosing a repair or alteration.
Take a clear note to the fitting
Write down the side of the opening, the layers connected and the exact point of concern. State whether you observed it with the dress supported or while wearing it. Ask what any proposed work changes and whether it affects the opening's operation. Keep the original construction and any unresolved question visible in the discussion rather than replacing them with a guessed diagnosis.
Keep reading
 Jumpsuits
 That Fit: How to Choose Rise, Leg Width and Fabric
How to pick a jumpsuit that fits: rise, leg width, fabric drape and waist. Includes a fit checker that suggests the cut for your proportions.
 Guides
Hollow to Hem Measurement: Check the Length Before You Order
Measure hollow to hem correctly, distinguish it from shoulder length and hollow to floor, and check whether your dress maker wants shoes or bare feet.
 Guides
Dress lining showing below the hem? Check both layers
Identify the layer below your dress hem, check normal movement and prepare a useful fitting request with two local aids and clear layer diagrams.